2. Booking menus and resources
On this page: You add the "bookable resources" that take bookings (staff, rooms, equipment), then set up their shifts and booking menus.
Resources, shifts and booking menus
Every booking in Marutto Booking combines three things.
| Term | What it is |
|---|---|
| Bookable resource | The person, place or thing being booked. Its type is "Staff", "Room/Space" or "Equipment" |
| Shift | The days and hours a bookable resource takes bookings. Set per location |
| Booking menu | What the customer books. Each menu is linked to one Shopify product and sets the duration, slot interval and so on |
Customers choose a bookable resource and a time on the booking menu's product page. The times on offer come from the resource's shifts and the menu's duration. One booking menu can be shared by several bookable resources.
The resource list
Open the "Bookable resources & menus" tab in "Settings" to see your bookable resources.
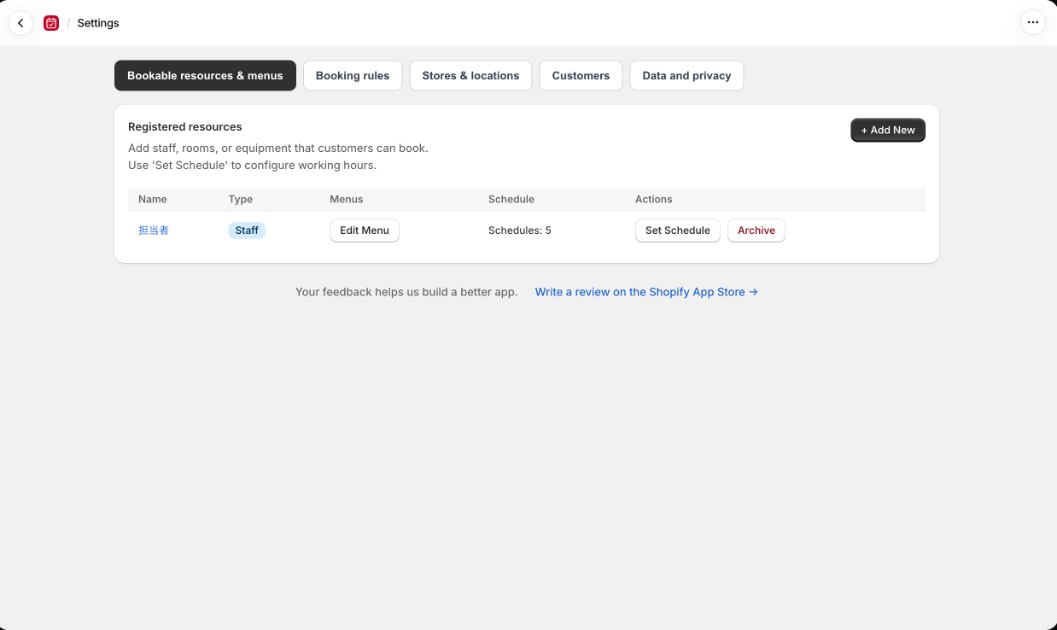
| Column | What it shows |
|---|---|
| Name | The resource's name. If the capacity is 2 or more, it also shows a badge such as "Capacity: 10". Click the name to change the name and capacity |
| Type | Staff, Room or Equipment |
| Menus | The booking menus linked to it. Set them with "Add Menu" or "Edit Menu" |
| Schedule | The number of shifts. Shows "Not set" if there are none |
| Actions | "Set Schedule" opens the resource's detail page. Remove a resource you no longer need with "Delete" or "Archive" |
Add a bookable resource
Click "+ Add New"
Enter a "Name" (for example, John, Room A or Booth B). Customers see this name
Choose a type
Type Examples Staff Consultants, instructors and so on Room/Space Private rooms, booths, studios and so on Equipment Special equipment, rentals and so on Enter the "Capacity (concurrent bookings)" (1–100)
Under "Initial Shift Settings", choose the locations that take bookings. Each selected location gets Monday–Friday shifts from 9:00 to 18:00 automatically
Click "Add"
If no locations are listed, load your store's locations from the home page first (1. Initial setup).
Capacity
Capacity is the maximum number of bookings for the same time. With 1, only one party can book; with 10, up to ten can book at once. Set it to 2 or more when one slot takes several customers, as with a workshop or an information session.
For a resource with a capacity of 2 or more, the booking calendar on your store shows how many places are left on each time, such as "Remaining capacity: 3". A time that has reached capacity shows "Full".
Archive or delete
| Situation | Action | Result |
|---|---|---|
| No booking history | "Delete" | Deletes the resource and its shifts. This can't be undone |
| Has booking history | "Archive" | Removes it from the booking calendar on your store and from manual booking options. Past bookings are kept, and you can bring it back with "Restore" |
You can't delete a resource that still has upcoming bookings. When you archive a resource, any booking menu assigned only to it stops taking bookings. Those product pages show an error and can't be purchased. Unpublish the menu or assign another bookable resource first.
Set shifts
Click "Set Schedule" in the list to open the resource's detail page.
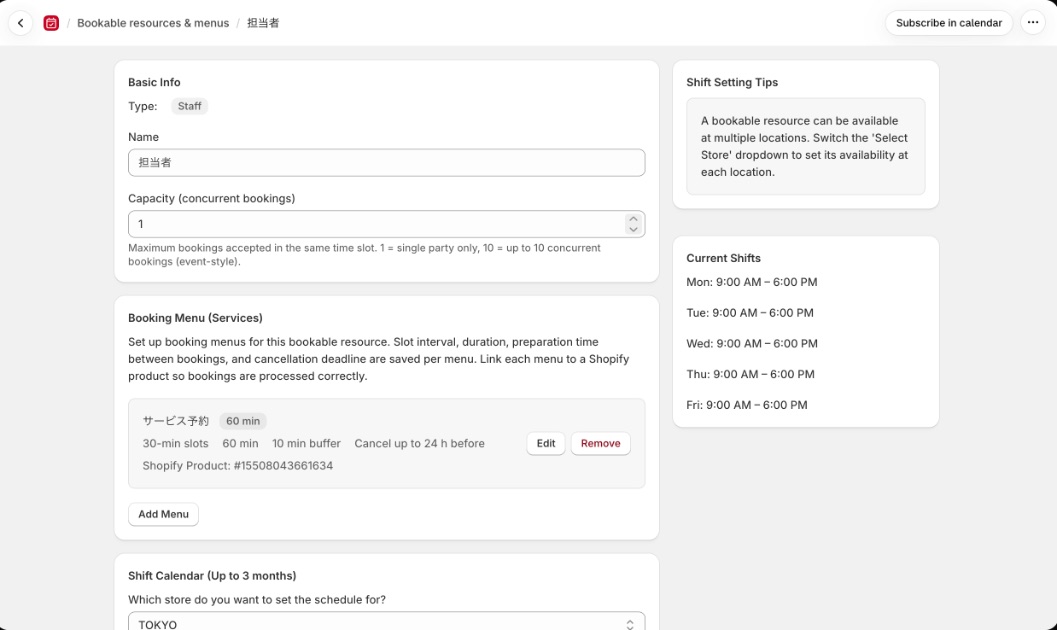
Shifts are set per location. Choose the location under "Which store do you want to set the schedule for?", then use either of the two methods below.
Weekly recurring shifts
Under "Weekly recurring shift settings", set the working days and hours for each day of the week. Checked days are workdays; unchecked days are days off. If you take bookings on the same days and hours every week, this is all you need.
Shifts for specific dates
Click a date in the "Shift Calendar (Up to 3 months)" to set a shift for that day only.
| Action | Result |
|---|---|
| Enter a start and end time, then "Save" | Takes bookings at those hours on that day only |
| "Close on this day" | No bookings that day, even if the weekly schedule has hours |
| "Remove date override" | Clears that day's setting and goes back to the weekly schedule |
"Create shifts" lets you register shifts for a whole period at once, from a start date, an end date and a day pattern. Uncheck "Overwrite existing individual settings" to keep shifts you've already set for specific dates.
You can't create shifts for past dates.
A resource built only from date-specific shifts stops taking bookings after its last date
On days without a date-specific setting, the weekly recurring shifts apply. A resource with no weekly shifts stops taking bookings after the last date you registered. As that date approaches, the home page shows "Some schedules are about to run out". To keep taking bookings, add shifts for later dates. Unpublishing a menu that has finished taking bookings hides the notice.
If a resource works at several locations, switch the location and set shifts for each one. Taking bookings at several locations is available on Pro.
Add a booking menu
Each booking menu is linked to one Shopify product. Add one with "Add Menu" in the list (on the detail page, "Add Menu" under "Booking Menu (Services)").
| Field | What it is |
|---|---|
| Use-case template | Choosing a use case shows suggested storefront copy (the calendar's heading and button text) |
| Shopify Product | Click "Select Product" and pick the product that takes bookings |
| Menu Name | The booking menu's name (for example, Cut & Color, 60 min) |
| Slot interval (minutes) | The interval between the start times customers can choose. 15 to 120, in steps of 15 |
| Duration (minutes) | How long each booking takes |
| Preparation time between bookings (minutes) | Time kept free between one booking and the next |
| Cancel Deadline (hours before) | Customers can cancel or change the date and time on My Page until this long before the start |
The fields start with the values from "Defaults for new menus" on the "Booking rules" tab (3. Booking rules).
If a bookable resource has no booking menus, customer bookings won't be processed correctly. Add a menu after adding a resource.
How preparation time is counted
Preparation time is the gap kept free between bookings. When two menus with different preparation times are next to each other, the longer of the two is kept. The two are not added together.
Only the booking itself (its duration) has to fit within the shift. The preparation time before the first booking may start before the shift does.
Share a menu across resources
If you add a product that already has a booking menu to another resource, you'll see "This product already has the service “…”". Adding it links the existing menu, and its name, duration, cancel deadline and other settings are shared by every resource linked to it.
To use a different duration for one resource only, open the menu with "Edit" and enter "Duration for this resource only (min)". Leave it blank to use the menu's shared duration.
Published and draft
A booking menu is either "Published" or "Draft". Switch with "Publish" and "Unpublish". The product page of a draft menu doesn't show the booking calendar.
On Free, only one booking menu can be published
You can create as many draft menus as you like. If you publish another menu on Free, the menu that was published goes back to draft. Basic and Pro have no limit on published menus.
Remove a booking menu
Use "Remove" on a menu to take it off the resource. You can't remove a menu that still has upcoming bookings.
What's next
- Set the booking cutoff and booking window: 3. Booking rules
- Add the booking calendar to your store: 4. Add the calendar to your store