5. Manage bookings
On this page: You check incoming bookings on the "Bookings" page. This is also where you add bookings taken by phone or in store, edit and cancel bookings, export CSV, and handle the waitlist and paid order exceptions.
The Bookings page
Open "Bookings" in the app menu. Switch views with "List" and "Calendar" at the top.
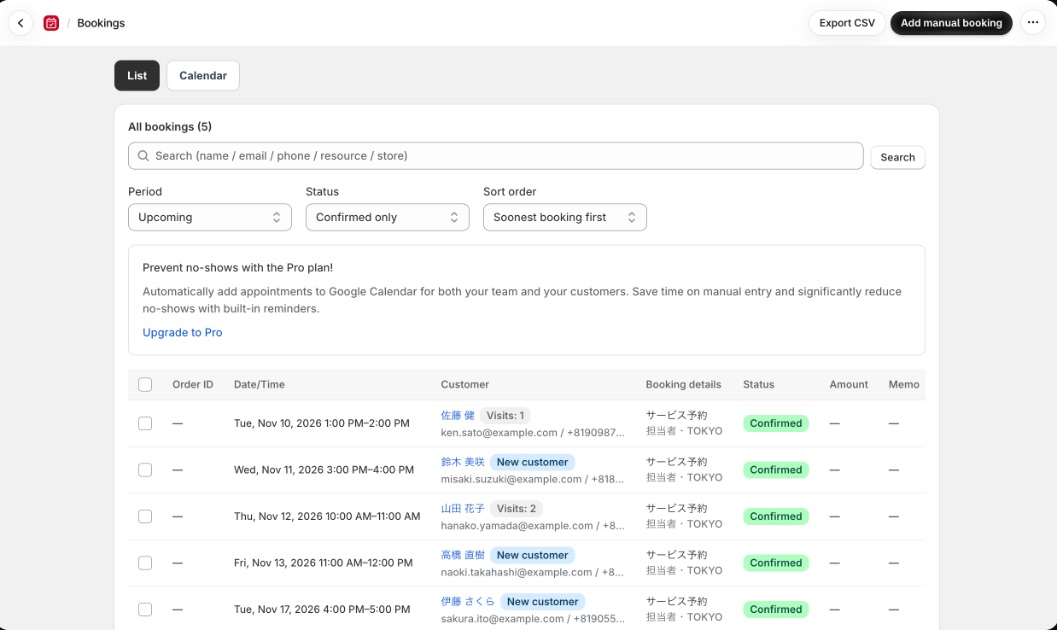
| Column | What it shows |
|---|---|
| Order ID | The Shopify order the booking came from |
| Date/Time | When the booking is |
| Customer | The customer's name, with their history so far, such as "New customer", "Visits: 3" or "No-shows: 1" |
| Booking details | The booking menu, bookable resource and location |
| Status | Confirmed, Awaiting checkout or Cancelled, plus Upcoming, Completed, Visit cancelled or No-show |
| Amount | The booking's amount. If the order isn't fully paid (Unpaid, Partially refunded, Refunded and so on), that status is shown too |
| Memo | The note the customer left when booking and their answers to your booking questions ("Customer"), and your internal memo ("Internal") |
| Actions | Buttons that depend on the booking's status (see Booking statuses and actions) |
A confirmed booking counts as "Completed" once its end time has passed. Mark a booking as "No-show" if the customer didn't come.
Filter bookings
| Filter | Options |
|---|---|
| Store | If you take bookings at several locations, choose one |
| Search | Search by name, email, phone, bookable resource or store |
| Period | Upcoming, Past, This Month, Last Month, Custom range, All dates |
| Status | Confirmed only, Cancelled only, Cancelled, payment outstanding, All statuses |
| Sort order | Soonest booking first, Latest booking first |
The list starts with "Upcoming" and "Confirmed only". To see past or cancelled bookings, change the period and status. "Clear filters" returns to the starting filters.
Calendar view
Switch to "Calendar" to see bookings on a month, week or day calendar. If you take bookings at several locations, choose a location first. At a location with two or more bookable resources, you can filter by "Bookable resource". Bookings are colored by bookable resource.
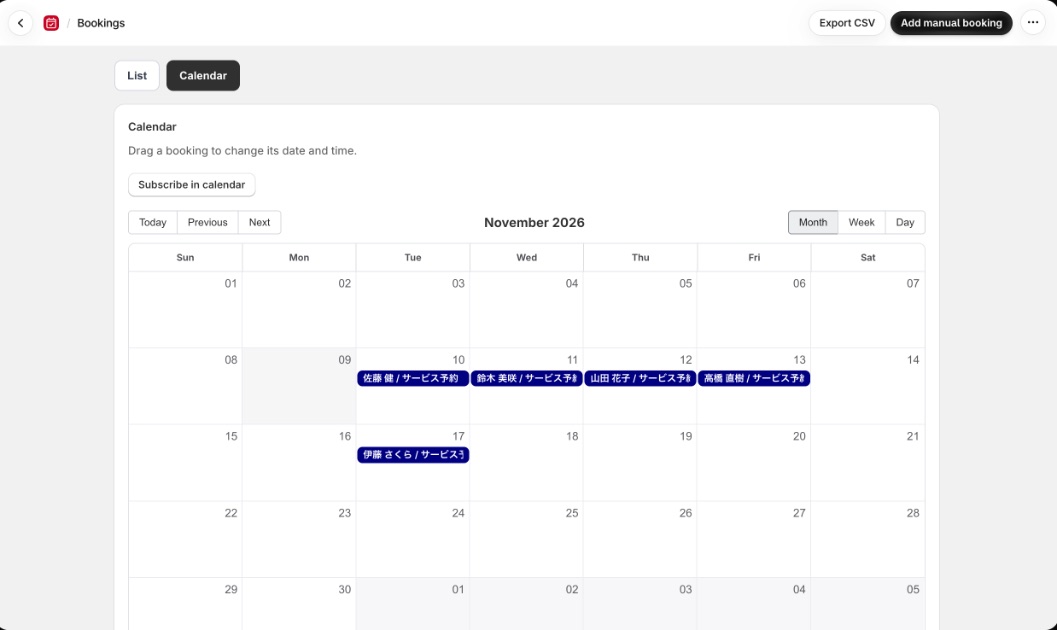
Drag a booking to change its date and time.
- When you move a booking with more than one menu, you can move the "Entire booking" or "This item only"
- Moving to a different bookable resource is done one item at a time. You can't move an entire booking to another resource at once
- The target resource must have shifts at that location and offer that menu
- For a booking marked as a no-show, clear the no-show before changing its date and time
Booking statuses and actions
| Status | Buttons in the list |
|---|---|
| Awaiting checkout | "Confirm". The customer is still going through checkout; you can confirm the booking yourself if you choose |
| Confirmed | "Edit" and the "…" menu (calendar options, "Mark as no-show" or "Clear no-show", "Cancel booking") |
| Cancelled | "Undo cancellation" returns it to confirmed |
Bookings awaiting checkout are gathered in the "Awaiting checkout" section above the list.
Edit a booking
"Edit" on a confirmed booking lets you change the following. To change the date and time, drag the booking in the calendar view.
| Field | What it is |
|---|---|
| Bookable resource | Change the staff member. If the new resource's shift doesn't cover that time, the change is rejected as outside business hours. To go ahead anyway, tick "Book outside business hours anyway" |
| Booking value | Can be changed only for bookings added by hand. Amounts imported from a Shopify order can't be edited |
| Memo | Your internal memo |
Cancel a booking
Cancel a booking with "Cancel booking" in the "…" menu.
The app never refunds automatically
If the booking has a paid order, the confirmation screen reminds you about refunds. To refund, use the order page in Shopify.
If a cancelled booking still has a payment, the home page shows "Cancelled bookings still have payments". Choose "Cancelled, payment outstanding" in the status filter to list those bookings.
If you cancel the order in Shopify, or fully refund the booking's line item, bookings that haven't started yet are cancelled automatically.
Act on several bookings at once
Tick bookings on the left of the list to "Confirm", "Mark as no-show" or "Cancel bookings" all at once. You can select up to 50 at a time. Only the selected bookings that allow that action are processed, one at a time, and you're told afterwards how many couldn't be processed.
Add a booking by hand
Bookings taken by phone, Instagram DM, in store and so on can be added with "Add manual booking".
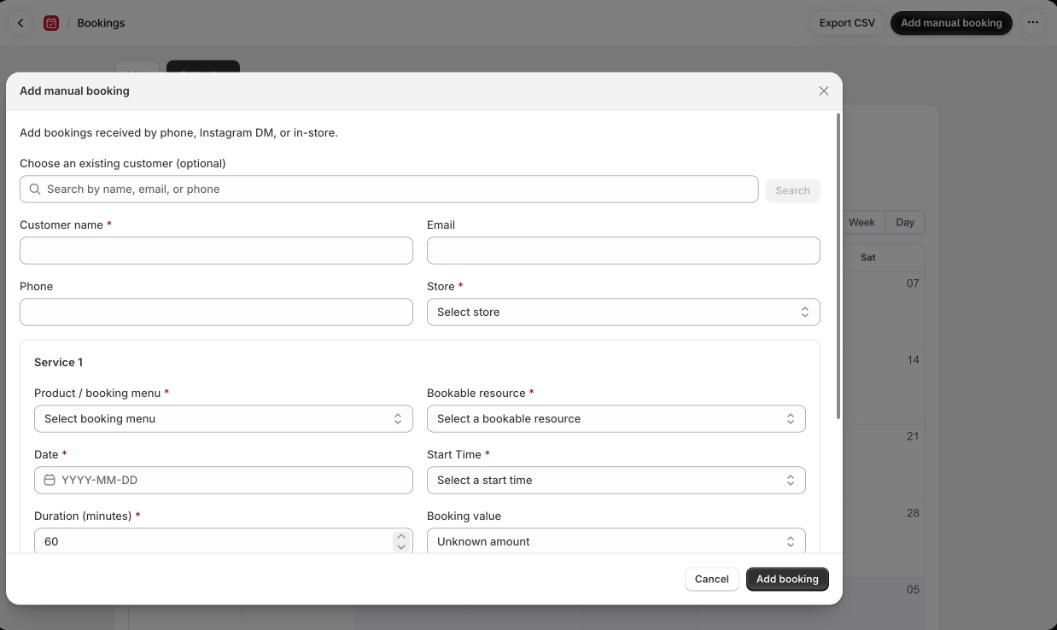
| Field | What it is |
|---|---|
| Choose an existing customer (optional) | Search Shopify customers by name, email or phone and pick one to link the booking to them |
| Customer name, Email, Phone | The customer name is required |
| Store | The location taking the booking |
| Product / booking menu, Bookable resource | What's being booked. Choose a resource that offers the selected menu |
| Date, Start Time, Duration (minutes) | Duration is 1–1440 minutes |
| Booking value | Unknown amount, Free, or Enter amount (in your shop currency) |
| Memo | Your internal memo |
"Add service" adds more menus to the same booking, one after another. Keep the gap between menus to 30 minutes or less.
If you choose a time outside the staff member's shift, you're asked to confirm "Outside business hours". "Book anyway" adds the booking regardless.
Manual bookings count toward your plan's limit
Both the 10 bookings on Free and the 30 a month on Basic include bookings you add by hand (10. Plans and pricing).
If you enter an email or phone number, the booking is linked to a Shopify customer with those details. A booking entered with only a name isn't linked to any customer. You can link it later from the customer profile (6. Customers and customer records).
Export to CSV
"Export CSV" downloads the bookings that match the current filters as a CSV file named "bookings_(date).csv".
The CSV has these columns:
Booking date/time, Customer name, Email, Phone, Booking menu, Bookable resource, Store, Order, Memo, Status, Created at, Customer note, Amount, Currency, Payment status, Booking question answers
Waitlist
If your booking calendar accepts a waitlist (4. Add the calendar to your store), entries appear under "Waitlist" on the Bookings page.
| Column | What it shows |
|---|---|
| Requested time | The time slot the customer is waiting for |
| Store / resource / menu | "No preference" if the customer didn't choose a staff member |
| Customer | Name, contact details and note |
| Status | Waiting or Contacted. When the slot opens up, it shows "Slot opened" |
When a slot opens, the home page also shows "A slot opened for customers on the waitlist".
The app doesn't notify waitlisted customers automatically
When a slot opens, contact the customer yourself. Then use "Mark as contacted", "Create booking" to make the booking, or "Close" if it's no longer needed.
Paid order exceptions
Orders that were paid but couldn't be confirmed automatically, for example because the slot was taken, appear under "Paid order exceptions" on the Bookings page. While there are open exceptions, every page shows a notice too.
| Type | What happened |
|---|---|
| Paid order and slot conflict | When the payment went through, the slot had already been taken by another booking |
| Late payment after slot hold | The payment went through after the hold time had run out |
| Paid order with no booking data | The order has no booking information left |
Review the order and resolve it in one of these ways. The app doesn't refund automatically.
| Resolution | How |
|---|---|
| Recover by linking a booking | Choose a "Recovery booking" and click "Recover by linking this booking". If there's nothing to link, create one first with "Add manual booking" |
| Close after refunding | Refund in Shopify, tick "I confirm the order was refunded in Shopify", then click "Resolve as refunded" |
| Close as handled | If you've already dealt with it, for example by adding a manual booking, tick the confirmation and click "Resolve as handled" |
A "Paid order with no booking data" can't be recovered by linking a booking. Close it as refunded or as handled.
What's next
- See each customer's visit history: 6. Customers and customer records
- See bookings in your calendar app: 8. Calendar sync and Sidekick
- Automate tagging and notifications when bookings are confirmed or cancelled: 9. Automate with Shopify Flow