4. Add the calendar to your store
On this page: You add the "Booking calendar" block to your product page in the theme editor. Then you check on the home page that it's in place, and look at how customers book and what they can do on My Page.
Before you start
- Your published theme supports app blocks. Any Online Store 2.0 theme (such as Dawn or Horizon) does
- You have a product linked to a booking menu, and that menu is "Published" (2. Booking menus and resources)
- The product's status is "Active". While it's a draft, the booking button shows a "sold out" message
The booking calendar only appears on the pages of products linked to a published booking menu. Add it once in the theme editor and it appears on every booking product that uses the same product template.
Add the booking calendar block
- Click "Open theme editor" under "Store status" on the home page. From the finish screen of Get started, use "Place it in the theme editor". If the app knows your booking product, the theme editor opens with that product in preview
- In the left sidebar, click "Add block" in the product information section
- Choose "Booking calendar" from the app blocks
- Check that the block is inside the product information section, then click "Save" in the top right
Put the block inside the product form
If it's outside the product form, it shows "Please add this block inside the product form." The "Product information" section of the product page is usually the right place.
If you preview a product that isn't linked to a booking menu, the theme editor shows a sample calendar. The sample only appears inside the theme editor. On your store, products linked to a booking menu show real availability.
On a product page that shows the booking calendar, the theme's "Add to cart" and "Buy it now" buttons are hidden. Customers buy through the calendar's "Book Now" button.
Block settings
Select the block in the theme editor to see its settings on the right.
| Group | What you can set |
|---|---|
| Use-case template | Pre-order events, fittings, and pop-ups; Pre-order event; Fitting; Popup visit; Event; Salon or service; Free consultation; Custom booking. Changes the default heading and button text |
| Wording | "Title", "Booking button label" and "Bookable resource label". Leave the button label blank to use the text that matches the use-case template |
| Show a "No preference" option | When two or more bookable resources are available, adds "No preference" at the top. Whoever is free is assigned when the booking is made |
| Customer note | Turn on "Show the note field" to let customers add a note when booking (up to 500 characters). It appears on the Bookings page. To ask specific questions, use booking questions in the app settings |
| Waitlist | Turn on "Let customers join a waitlist for full time slots" to let customers join a waitlist for a full slot. No notification is sent automatically |
| Appearance | Theme (Match theme, Light, Dark, Custom), accent color, button and selected text color, spacing, outer border, corner radius, font |
| Width and alignment | Fill the container or set a maximum width; alignment (left, center, right) |
| Dates and time slots | Date picker (monthly calendar or horizontal date strip), number of time slot columns, time slot label (start–end or start time only) |
"Match theme" uses your store's fonts, text color and background color as they are. The horizontal date strip puts dates in a single row, so the calendar stays short on phones.
Check that it's in place
The status of the "Booking calendar" is shown under "Store status" on the home page.
| Status | Meaning |
|---|---|
| Added | The booking calendar is in your published theme |
| Seen on your store | We've confirmed that the booking calendar has loaded on your store |
| Not added | Your published theme doesn't have the booking calendar. Add the block to your product page |
| Theme not supported | Your published theme doesn't support app blocks. Switch to an Online Store 2.0 theme to add the calendar |
| Checking | Your published theme is being checked |
How customers book
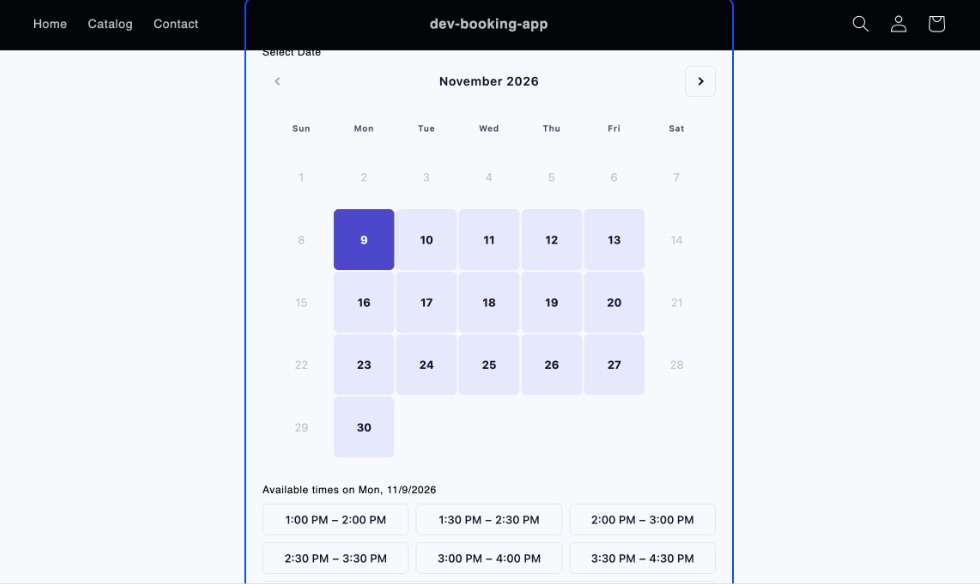
- If you take bookings at more than one location, the customer chooses a location
- If there are two or more bookable resources (staff, rooms or equipment), the customer chooses one
- The customer chooses a date, then one of the available times
- If the note field is on, they can add a request (optional)
- They check the location, resource and time under "Booking Summary" and click "Book Now". "Reset Selection" starts over
- The slot is held, the product goes into the cart, and the customer goes on to checkout
- Once the customer places the order, the booking is confirmed and appears on the app's Bookings page
The order line gets a "Booking date & time" property. The order confirmation email comes from Shopify. How to show the booking time in that email is in 7. Customer notifications.
How taken times are shown
| Resource setup | How a taken time is shown |
|---|---|
| Capacity 1, no waitlist | It isn't listed |
| Capacity 2 or more | Shown as "Full". Available times show what's left, such as "Remaining capacity: 3" |
| Waitlist on | Shown as "Full – join waitlist". Clicking it opens the waitlist form |
In the waitlist form, the customer enters their name, email, phone (optional) and a note (optional), then clicks "Join waitlist". Waitlist entries appear under "Waitlist" on the Bookings page (5. Manage bookings).
Make a test booking
Once the calendar is in place, make one booking on your store. Go from the calendar's "Book Now" through checkout and place the order. If the booking appears on the app's "Bookings" page, you're ready to take bookings.
How test bookings count on Free
On Free, cancelling a booking on the Bookings page doesn't give back one of your 10 bookings. Cancelling the test order in Shopify does take that booking out of the count.
My Page
Customers can check their own bookings on My Page. Its URL is:
https://(your store's domain)/apps/booking/mypageLink to it from your store's menu or from emails to customers.
| Customer | What they see |
|---|---|
| Logged in to your store | "Upcoming" and "Past and cancelled" |
| Not logged in | A link to the login page, and a form to look up a booking by order number. Entering the email used at checkout and the order number (for example, #1001) shows that order's bookings |
On My Page, customers can do the following.
| Action | When it's available |
|---|---|
| "Cancel" | Until the booking menu's cancellation deadline |
| "Change date & time" | Until the cancellation deadline. They can move to an open time with the same menu, the same staff and the same location. Bookings with more than one menu can't be moved |
| "Add to Google Calendar" and "Download ICS" | Shown on confirmed bookings in stores on Pro |
After the deadline, they see "The cancellation deadline has passed. To make changes, please contact the store." Customers who want a different menu or staff member are told to cancel and book again.
Cancelling on My Page doesn't issue a refund
My Page tells customers: "If you have already paid, please contact the store about refunds." If a refund is needed, issue it from the order page in Shopify.
What's next
- Check incoming bookings: 5. Manage bookings
- Show the booking time in order confirmation emails: 7. Customer notifications