9. Automate with Shopify Flow
On this page: You combine Marutto Booking with Shopify Flow to automate tasks such as "tag the customer when a booking is confirmed" or "email staff when a booking is cancelled". If you haven't used Shopify Flow before, start with how Flow works.
What Shopify Flow is
Shopify Flow is Shopify's automation app. You build a workflow on screen, without writing code, that says "when something happens, and it matches these conditions, do this".
A workflow is made of three kinds of steps, connected from top to bottom.
| Step | What it does | Examples |
|---|---|---|
| Trigger | Starts the workflow | A booking is confirmed, a booking is cancelled, a booking starts in 24 hours |
| Condition | Decides whether to continue (optional) | The menu is "Haircut", the location is "Downtown", the customer made the change |
| Action | Does the work | Add a tag to the customer, email your staff |
For example, connect "a booking is cancelled (trigger) → email your staff (action)" and your staff get an email every time a booking is cancelled.
In stores with Marutto Booking installed, its six triggers appear in Flow's list of triggers. Marutto Booking provides triggers only. Tagging, sending emails and other steps come from Shopify's own actions or other apps.
Adding Shopify Flow
Install Shopify Flow from the Shopify App Store. Check which Shopify plans can use it in the Shopify Help Center. Once installed, "Flow" appears under "Apps" in Shopify admin.
Plans
Shopify Flow integration is a Pro feature. On Free and Basic, the "Shopify Flow integration" section on the "Booking rules" tab in "Settings" shows a note about Pro, and no triggers are sent. If you move down from Pro, triggers stop being sent (10. Plans and pricing).
Build your first workflow
As an example, here's a workflow that adds the tag booked to the customer when a booking is confirmed.
- In Marutto Booking, open the "Booking rules" tab in "Settings" and click "Open Shopify Flow" in the "Shopify Flow integration" section at the bottom. Flow opens
- Click "Create workflow"
- Click "Select a trigger", type
Bookingin the search box and choose Marutto Booking's "予約が確定したとき (Booking created)" - Click the connector below the trigger and choose "Action". Type
Add customer tagsin the search box and choose Shopify's "Add customer tags". The Shopify customer included in the trigger is used automatically - Enter
bookedunder Tags - Give the workflow a name you'll recognize later from "More actions" › "Rename" at the top right (for example, Tag customer when booking is confirmed)
- Click "Turn on workflow" at the top right
In step 3, you can also open "Maru Booking & Appointments" (Marutto Booking's name in Flow) in the list of triggers to see only Marutto Booking's triggers.
The finished workflow looks like this.
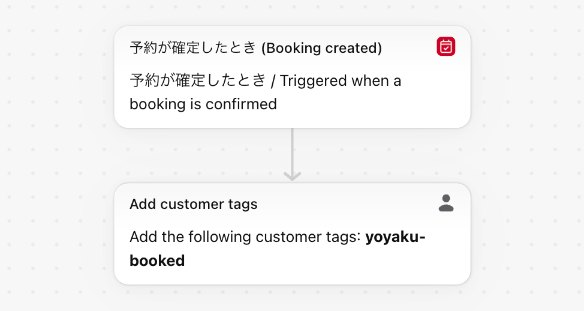
From then on, customers are tagged when their booking is confirmed. Bookings confirmed before you turned the workflow on aren't affected.
- Marutto Booking's triggers are listed with a Japanese name followed by the English name in parentheses (such as
予約が確定したとき (Booking created)). Flow shows the same name in every language. See the table in Marutto Booking's triggers - A workflow does nothing until you turn it on. To stop one you no longer need, click "Turn off workflow"
Check that it works
- Try it with a test booking: On "Bookings", click "Add manual booking", choose a test customer under "Choose an existing customer" and save. Workflows that start with "予約が確定したとき (Booking created)" run. You can try the cancellation, reschedule and no-show triggers on the same booking. Note that cancelling the test booking also runs workflows that start with "予約がキャンセルされたとき (Booking cancelled)"
- Try the timed triggers: "予約の24時間前 (Booking reminder 24h before)" is sent 24 hours before the booking starts, and "来店が済んだとき (Visit completed)" about 2 hours after it ends. Neither is sent earlier, so check the result once that time has passed
- Check the result: Flow's "Recent runs" shows when each workflow ran and the result. Click a row to open the run details and see which step it reached. Runs are kept for 14 days
- If a run fails: The list of steps near the bottom of the run details shows which step failed and why. Steps after the failed one don't run. Fix the workflow, then click "Retry" at the top right of the run details to run it again
Marutto Booking's triggers
When choosing a trigger in Flow, look for the name in the middle column. The same names are shown in Marutto Booking under "Shopify Flow integration" on the "Booking rules" tab in "Settings".
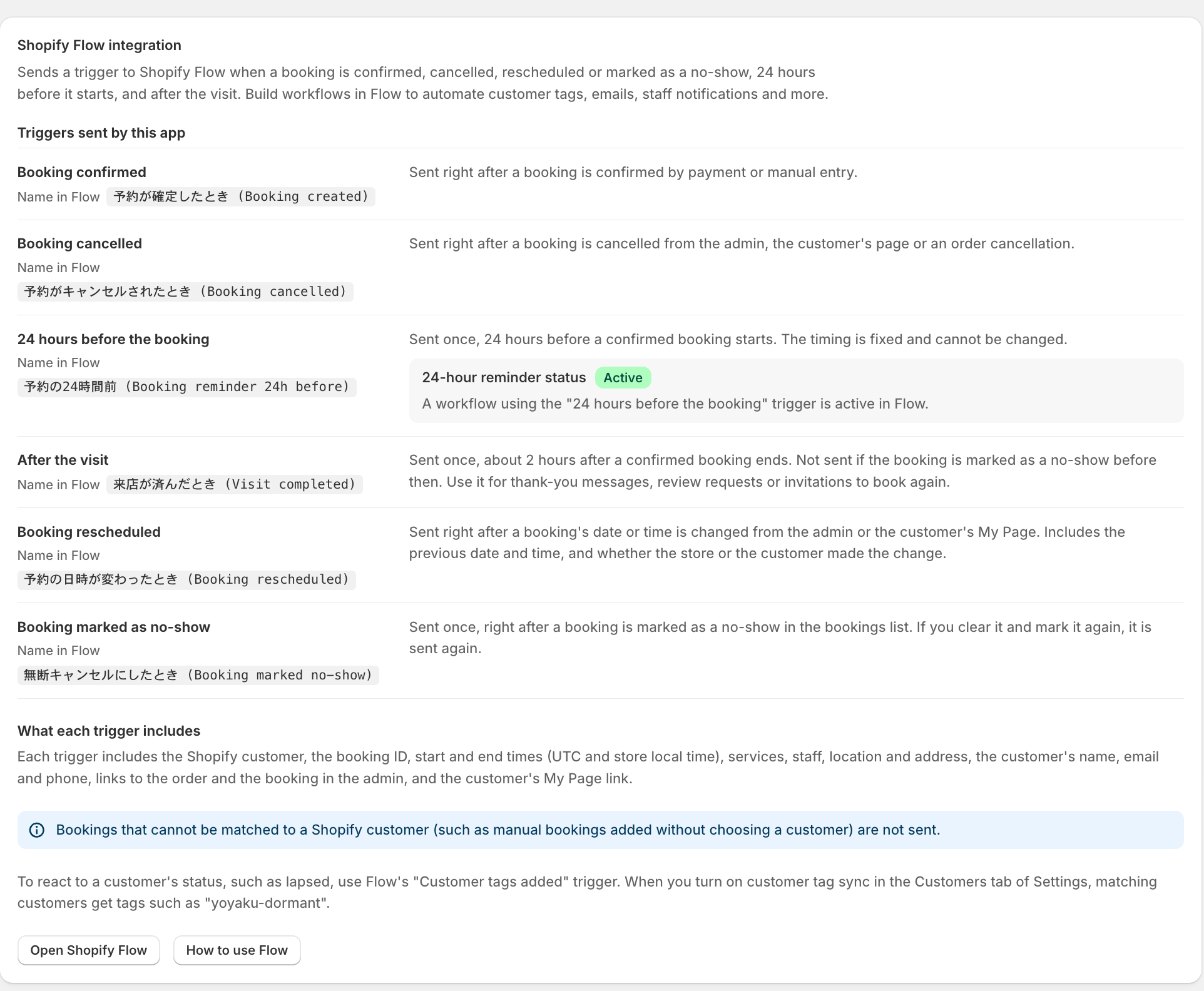
| Name in the app | Name in Flow | When it's sent |
|---|---|---|
| Booking confirmed | 予約が確定したとき (Booking created) | Right after a booking is confirmed by payment or manual entry |
| Booking cancelled | 予約がキャンセルされたとき (Booking cancelled) | Right after a booking is cancelled from the admin, the customer's My Page or an order cancellation |
| 24 hours before the booking | 予約の24時間前 (Booking reminder 24h before) | Once, 24 hours before a confirmed booking starts. The timing is fixed and can't be changed. Sent only while a workflow using this trigger is turned on (status) |
| After the visit | 来店が済んだとき (Visit completed) | Once, about 2 hours after a confirmed booking ends. Not sent if the booking was marked as a no-show before then |
| Booking rescheduled | 予約の日時が変わったとき (Booking rescheduled) | Right after a booking's date or time changes in the admin or on My Page. Sent once for every change |
| Booking marked as no-show | 無断キャンセルにしたとき (Booking marked no-show) | Once, right after you mark a booking as a no-show on "Bookings". If you clear it and mark it again, it's sent again |
"Booking rescheduled" is sent when:
- You drag a booking to a new time in the calendar view of "Bookings" (5. Manage bookings)
- You change the bookable resource (staff) with "Edit" and the end time changes
- The customer changes the date or time on My Page
None of the triggers is sent for a booking that can't be matched to a Shopify customer (Bookings without a Shopify customer).
Fields included in each trigger
All six triggers carry these fields. Use them in later conditions or in the body of an email. Click the </> button next to an input to open "Add variable" and pick a field.
| Field name in Flow | What it contains |
|---|---|
| Customer | The Shopify customer. Lets Flow read the customer's tags, email and more, and works with actions that act on a customer, such as "Add customer tags" |
| Booking ID | The booking ID |
| Start At / End At | Booking start and end time (UTC) |
| Start At Local / End At Local | Booking start and end time in the location's local time (for example, 2026-11-20 14:00) |
| Timezone | The timezone of the local times (for example, Asia/Tokyo) |
| Service Name | The booking menu's name |
| Service Names | All booking menu names of the same visit, comma separated |
| Resource Name | The bookable resource's name |
| Location Name / Location Address | The location's name and address (empty if no address is set) |
| Customer Name / Customer Email / Customer Phone | The name, email and phone on the booking (empty if no phone was given) |
| Order Name | The order number (for example, #1001) |
| Order URL | The order's URL in Shopify admin (empty for manual bookings) |
| Admin Booking URL | The booking's URL in this app |
| My Page URL | The storefront URL where the customer can look up the booking |
| Delivery Event ID / Schedule Revision | Values that identify each delivery |
"Booking rescheduled" also carries these fields.
| Field name in Flow | What it contains |
|---|---|
| Previous Start At / Previous End At | Start and end time before the change (UTC) |
| Previous Start At Local / Previous End At Local | Start and end time before the change, in the location's local time |
| Rescheduled By | Who made the change: merchant when you changed it in the admin, customer when the customer changed it on My Page |
The same trigger can arrive more than once. If you don't want to act twice, use Delivery Event ID to tell deliveries apart. For "Booking rescheduled", each change has its own Delivery Event ID.
Bookings without a Shopify customer
Before sending a trigger, Marutto Booking checks the booking's Shopify customer. If the booking isn't linked to a customer, it looks for a Shopify customer with the same email address as the booking.
If neither finds a customer, no trigger is sent for that booking. For example:
- A booking added with "Add manual booking" without choosing a customer and without an email address
- A booking with an email address that doesn't belong to any customer in Shopify
Bookings made on your storefront use the order's customer, so they're normally sent. To use Flow with bookings taken by phone or in store, choose the customer under "Choose an existing customer" when you add the booking (5. Manage bookings).
The 24-hour reminder status
The "24 hours before the booking" trigger is sent while a workflow using it is turned on in Flow. In the "Shopify Flow integration" section on the "Booking rules" tab in "Settings", the "24 hours before the booking" row shows one of these.
| Status | Meaning |
|---|---|
| Active | A workflow using the "24 hours before the booking" trigger is active in Flow |
| Sending with previous setup | Reminders are still sent under a previous setup whose status in Flow couldn't be confirmed. Turn the workflow on again in Flow to refresh the status |
| Not set up or inactive | No active workflow in Flow uses the trigger. Create a workflow and turn it on to start sending |
Email your customers (marketing automations)
Flow's "Send internal email" is meant for notifying your staff. To email customers, use Shopify's marketing automations. Marutto Booking's triggers include the Shopify customer, so you can choose them as triggers in marketing automations too.
As an example, here's how to email customers 24 hours before their booking.
- In Shopify admin, open "Marketing" › "Automations" and create a new automation
- Choose Marutto Booking's "予約の24時間前 (Booking reminder 24h before)" as the trigger
- Add an action that sends a marketing email, and write the email
- Turn the automation on
- Check that the 24-hour reminder status under "Shopify Flow integration" on the "Booking rules" tab in "Settings" shows "Active"
In the same way, use "Visit completed" to send a thank-you message or ask for a review after the visit.
Marketing emails only reach customers who agreed to receive them
Emails from marketing automations go to customers who have subscribed to email marketing. Customers who haven't subscribed don't receive them. See the Shopify Help Center for details.
Workflow examples
| What you want | Trigger | Conditions and actions |
|---|---|---|
| Tag the customer when a booking is confirmed | Booking confirmed (Booking created) | Shopify "Add customer tags" |
| Email customers a reminder 24 hours before their booking | 24 hours before the booking (Booking reminder 24h before) | Send an email with a marketing automation (steps) |
| Email staff when a booking is cancelled | Booking cancelled (Booking cancelled) | Shopify "Send internal email" |
| Email staff when a customer reschedules | Booking rescheduled (Booking rescheduled) | Condition: Rescheduled By is customer → Shopify "Send internal email" |
| Tag customers who didn't show up | Booking marked as no-show (Booking marked no-show) | Shopify "Add customer tags" |
| Send a thank-you or review request after the visit | After the visit (Visit completed) | Send an email with a marketing automation |
- Put Start At Local, Customer Name and Admin Booking URL in a staff email to include the booking time, the customer and a link to the booking. For reschedules, add Previous Start At Local to show the previous time as well
- Besides Shopify's internal email, you can notify staff with actions from apps such as Slack
- Customers with a no-show history can also be tagged by customer tag sync (
yoyaku-no-show) on the "Customers" tab in "Settings" (6. Customers and customer records)
React to a customer's status
To run a workflow based on a customer's status, such as lapsed, use Flow's "Customer tags added" trigger. When you turn on customer tag sync on the "Customers" tab in "Settings", matching customers get tags such as yoyaku-dormant (6. Customers and customer records).
What Flow doesn't do
These need checking before they're done, so they aren't Flow actions. Do them in the app as before.
- Cancelling bookings (5. Manage bookings)
- Changing a booking's date and time (5. Manage bookings)
- Closing days or times to bookings (2. Booking menus and resources)
Troubleshooting
| Problem | What to check |
|---|---|
| Marutto Booking's triggers don't appear in Flow | Check that Marutto Booking is installed, then reload Flow. Search for Booking to find them (the names look like 予約が確定したとき (Booking created)) |
| The workflow doesn't start | Check that you're on Pro and the workflow is turned on. It doesn't run for bookings made before you turned it on |
| The workflow starts for some bookings but not others | Triggers aren't sent for bookings without a Shopify customer (Bookings without a Shopify customer). When adding bookings by hand, choose the customer under "Choose an existing customer" |
| The 24-hour trigger isn't sent | Check that the 24-hour reminder status under "Shopify Flow integration" is "Active" (status) |
| The "Visit completed" trigger isn't sent | It's sent about 2 hours after the booking ends, and not for bookings marked as a no-show before then |
| The reschedule trigger arrives several times | It's sent once for every change. If you move a booking several times in the calendar view, it arrives that many times |
| The same trigger arrives twice | Occasionally the same delivery arrives more than once. Deliveries with the same Delivery Event ID are the same delivery |
| Some customers don't receive the marketing email | Customers who haven't subscribed to email marketing don't receive it |
| You fixed an error and want to run it again | Click "Retry" at the top right of the run details |
Next: 10. Plans and pricing